

|
Useful editorial software, resources and templates
I've expanded my Resources page to provide fellow editors and proofreaders – particularly new entrants to the field – with a one-stop shop for some of the business tools I've created. 
I'll keep adding to this editor resource hub as new tools become available. In the meantime, this is a flavour of what's on offer:
Where appropriate, I've included the raw Excel or Word files, rather than PDFs, so that you can amend for your own needs. Visit the Editor Resources page to access the links.
Louise Harnby is a line editor, copyeditor and proofreader who specializes in working with crime, mystery, suspense and thriller writers.
She is an Advanced Professional Member of the Chartered Institute of Editing and Proofreading (CIEP), a member of ACES, a Partner Member of The Alliance of Independent Authors (ALLi), and co-hosts The Editing Podcast. Visit her business website at Louise Harnby | Fiction Editor & Proofreader, say hello on Twitter at @LouiseHarnby, connect via Facebook and LinkedIn, and check out her books and courses.
2 Comments
MultiSwitch is another gem of created by my colleague Paul Beverley. This useful little macro speeds up onscreen editing and proofreading.
The macro is available in his free book, Computer Tools for Editors. In a nutshell, it allows you to switch around a word (or words) with a single keyboard shortcut. I use it to save time with every single Word-based project I work on.
Imagine that you’re editing or proofreading a Word file in which the author repeatedly uses ‘which’ for restrictive relative clauses. You want to change it to ‘that’. This means carrying out three small actions: select, delete and retype.
That’s not a problem if the issue occurs twice in a file, but if it occurs tens or hundreds of times, those seconds are going to add up and eat into your hourly rate. And let’s not get started on the ache in your wrist!
Naturally, you might notice that a particular job has a number of similar niggles that you want to attend to, in which case this macro will be even more of a productivity-enhancer. Give it a whirl! MultiSwitch in action To run MultiSwitch, you simply place your cursor before or in the word you want to change (in our example here, ‘which’), and hit your keyboard shortcut (I’ve assigned alt-3, but you can choose whatever you like). Then, bingo, the macro amends ‘which’ to ‘that’. Here's a teeny-tiny video of me using MultiSwitch. This demo aims merely to show you where to place the cursor prior to hitting your assigned shortcut key command, and what you will see on your screen (a little flickering as the macro makes the switch). If you don’t know how to assign a keyboard shortcut, don’t worry – I’ll show you how later in the article. The beauty of MultiSwitch is that you need only one keyboard shortcut for a ton of different word switches. Here are a few examples from my switch list:
I love this macro for editing fiction because it's so quick to create contractions when I'm helping the author create a more informal narrative, or dialogue that's closer to natural speech. Further down, I explain how to create your list – it's a doddle. Or, if you'd like to save even more time, grab a free copy of my contraction switch list. You can edit it to include your own word switches. 
Installing MultiSwitch
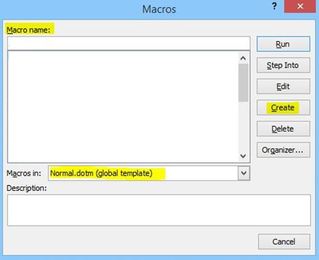
Go to Paul’s website and download Computer Tools for Editors. Save the zipped folder to your computer and extract three files: one is an overview of the macros – what they are, what they do, how to store them and so on – plus all the programs themselves; another contains just the actual macro programs; a third is called ‘Beginners Start Here’; and the final file is a style sheet. The file you need to open in Word is ‘The Macros’. Use Word’s navigation menu on a Mac (or Ctrl F on a PC) to open the Find function. Type ‘Sub MultiSwitch’ into the search field and hit ‘Return’ twice. That will take you to the start of the relevant script. Select and copy the script from ‘Sub MultiSwitch()’ down to ‘End Sub’. Still working in Word, open the ‘View’ tab and click on the ‘Macros’ icon on the ribbon: 
A new window will open.
If you don’t have any macros already loaded:
If you already have macros loaded (your TEST macro or any other):
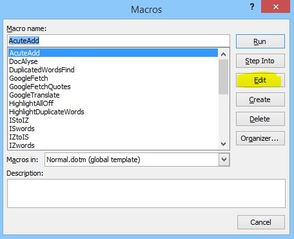
This will open up another window: 
Don’t close this Visual Basic window quite yet – there’s something else you need to do first! Creating your MultiSwitch list Now head over to Word. Open a new document and call it zzSwitchList. Create your list using the following style: that which which that last past like such as less fewer Less Fewer it is it's Save it somewhere just as meaningful! Mine’s in my Macros folder, but you can save it wherever it suits you. Now close the document. You can amend this list any time you want to – just add or delete words as you see fit. Changing the MultiSwitch script Now you're going to make a small amendment to the macro script so that it's personalized for you, so go back to the window into which you pasted the MultiSwitch script. At the top of the script, you’ll see the following:
Sub MultiSwitch()
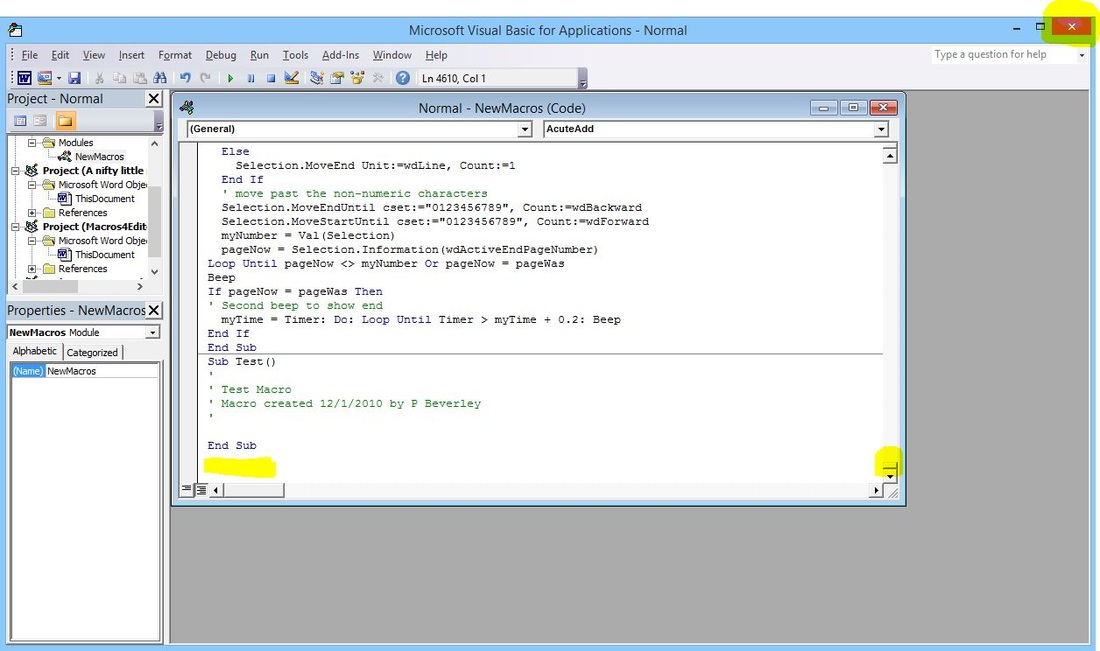
' Version 06.12.17 ' Scripted word/phrase switching maxWords = 8 listName = "zzSwitchList" myDir = "C:\Users\Louis\Dropbox\Macros\" ' Set min number of chars for an abbreviation minChars = 2 includeApostrophe = True useSpike = True The text in red shows how I’ve customized the script to suit my needs – you need to put in your own location. Now you can close the window by clicking on the ‘X’ in the top right-hand corner. Do the same with the general Visual Basic window too. Don’t worry if you get a message about a debugger – just press ‘OK’. Creating the keyboard shortcut for running MultiSwitch If you don't know how to create keyboard shortcuts, this section's for you. If you do know how to do this, you don't need to read any further! I'm working in Word 2016 on a PC. If you are too, the instructions are as follows:
(If you are working in a different version of Word, see pp. 14–15 of the ‘ComputerTools4Eds’ file in the Macros folder that you've downloaded from Paul’s site in order to install this macro. There, he provides details of the process for different versions of the software.) The image below shows how I assigned a keyboard shortcut to another macro called ‘UndoHighlight’. The steps are exactly the same. 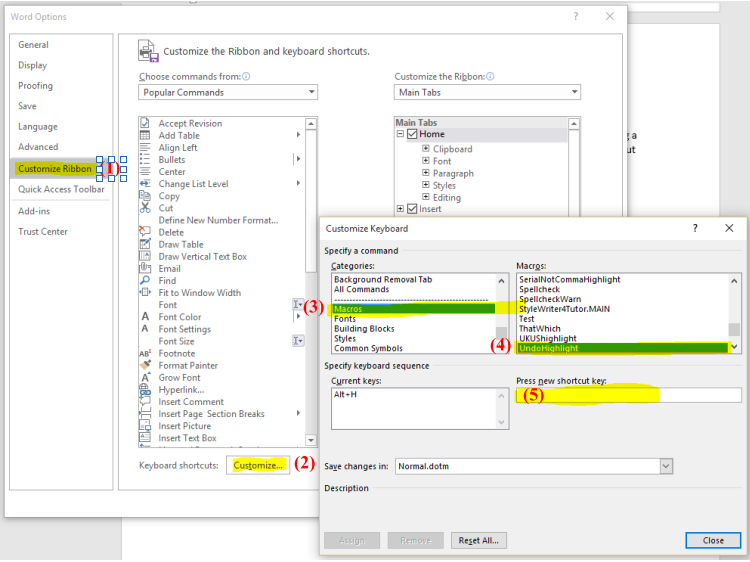
That's it! I hope this macro saves you as much time as it's saving me!
Louise Harnby is a line editor, copyeditor and proofreader who specializes in working with crime, mystery, suspense and thriller writers.
She is an Advanced Professional Member of the Chartered Institute of Editing and Proofreading (CIEP), a member of ACES, a Partner Member of The Alliance of Independent Authors (ALLi), and co-hosts The Editing Podcast. Visit her business website at Louise Harnby | Fiction Editor & Proofreader, say hello on Twitter at @LouiseHarnby, connect via Facebook and LinkedIn, and check out her books and courses.
Here's how to create ballpark prices for proofreading and copyediting using Excel.
There have been some interesting discussions about pricing models in the online editorial community recently.
If you prefer a per-word model, then you may like to consider using a progressive-pricing array formula. It’s not the only way of doing things, certainly, but it’s something I’ve tested and am currently working with. I like this model because it incorporates economies of scale. Before I explain how the progressive-pricing array works, a very quick word on price presentation versus determination. Price presentation versus determination Price presentation and determination are two different things.
Economies of scale When a proofreader is working on larger projects, there are economies of scale. I’m currently working with an independent fiction author on nine books (which I’m proofreading over a five-month period). Most of the projects are between 70,000 and 80,000 words in length; a couple are around the 50,000-word mark; and one is a short story with just over 10,000 words. All of the books feature the same central protagonist and a small cast of supporting characters. The serial nature of the content, the reappearance of key characters, and the concentration of action in predominantly one fictitious location all serve to save me time as I move through each book. This means:
Even so, the average number of words proofread per hour was fewer for the 10K-word short story than for the previous 70K-word novel. And in the first few hours of working on the the 70K-word novel, I proofread fewer words per hour than was the case in the hours that followed. That’s because, even with all the benefits of working on a series, each book still needs a certain amount of ‘stuff’ done to it in its own right:
If we take the series element out of the equation, and compare the proofreading of two books in a similar genre for two separate authors, the impact of project length for the proofreader can become even more stark. Consequently, I want to price the 30K-word novella differently from the 100K-word tome. It’s for this reason that while I like to build my quotations on a per-word basis, I don’t want something as straightforward as a £6, £8 or £10 per 1,000 words model. Instead, I want something that respects the economies of scale that come with larger projects. This is where the array comes into its own. How does a progressive-pricing array formula work? An array formula can look at a number (a word count, in our case) and then, based on a set of ranges that we’ve provided, price those ranges accordingly. Here’s a very basic example. You might set up your array such that the following are true:
This would result in the following quotes: (1) If you were asked to provide a quotation for proofreading a 2,000-word article, the price would be £50 (£25 per 1000 words). (2) If you were asked to quote for a 10,000-word short story, the price would be £175. This is based on:
The average price per 1,000 words works out at £17.50. (3) If you were asked to quote for a 70,000-word book, the price would be £575. This is based on:
The average price per 1,000 words works out at £8.21 and reflects the economies of scale that the proofreader will be able to benefit from because of the size of the book. A progressive-pricing array formula in action I’ll admit that it did take some fiddling to get the actual formula working for me. I used this as my template: ‘Progressive Pricing Formulas For Excel’ (www.cpearson.com). The example given is similar to the setup I wanted for my own quotation tool, and it provides a formula that I was able to tweak for my own data. See also my downloadable sample below. Here's a screen shot of what a progressive-pricing array formula might look like in Excel. 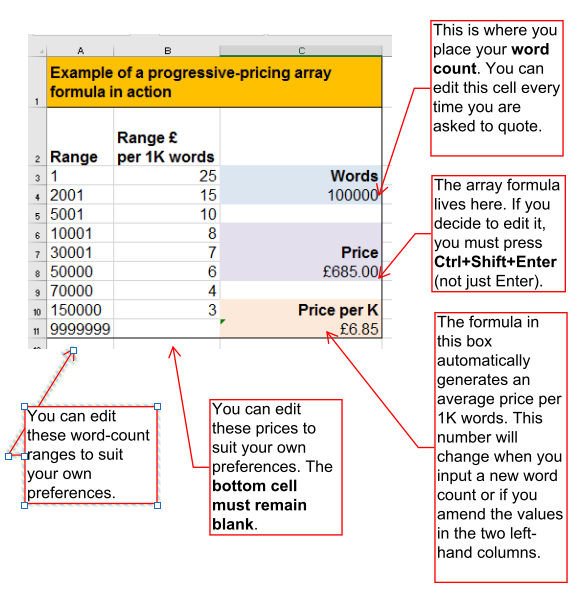
And here's an Excel template you can download and adapt to suit your own preferences. Note that you'll need to look carefully at, and amend, the array-formula box to ensure that the cell descriptions are correct for your data (that's the fiddly bit!).
One size doesn’t fit all
The usual caveat applies – my way certainly isn’t the best way or the only way! It’s just one approach of several. I wanted to share my experience with you so that if you fancy testing a progressive-pricing array, you have a framework to get you started. In practice, you might want to build more ranges into your array formula to provide increased flexibility. The numbers I’ve used above are just for illustrative purposes. I find the array formula useful for ballpark quotations because I want to provide a quick quote based on a word count. Obviously, any professional proofreading project needs to be evaluated on more than just a word count before terms are agreed and confirmed. Those editorial professionals working with complex projects that require varying levels of intervention might find a progressive-pricing array formula far too limiting. It functions well for me as a proofreader because of the nature of my work. I do, however, have different arrays set up for different client types (e.g. students for whom English is a second language; independent authors whose first language is English) and for different levels of proofreading service. The prices I assign to the various ranges are different in order to reflect the variances in how I work with the text and the speed at which I am able to proofread. How do you build a price for editorial work? How do you build your quotations? Per hour, per word, per day, per project? Have you tested different approaches for building your fees? And do you find that different models work better for different types of editorial work? I’m always interested in learning how others go about pricing editorial work so please do leave a comment if you have something to share. UPDATE (August 2020): For more help with fees, take a look at my guide How to Develop a Pricing Strategy. 
Louise Harnby is a line editor, copyeditor and proofreader who specializes in working with crime, mystery, suspense and thriller writers.
She is an Advanced Professional Member of the Chartered Institute of Editing and Proofreading (CIEP), a member of ACES, a Partner Member of The Alliance of Independent Authors (ALLi), and co-hosts The Editing Podcast. Visit her business website at Louise Harnby | Fiction Editor & Proofreader, say hello on Twitter at @LouiseHarnby, connect via Facebook and LinkedIn, and check out her books and courses. If you're a writer or editor who says, "That's not a word!", then this useful link might make you reconsider: OneLook Dictionary Search. (Hat tip to Stan Carey on the Sentence First blog for drawing my attention to it.) Simply search for your chosen not-a-word and OneLook will provide you with a list of links to dictionaries that provide definitions according to current usage. Of course, that doesn't mean you have to like the word that you think is not a word but that actually is a word. Nor does it mean you have to use it. But not liking or not using a word is not the same thing as denying its existence! The following make for interesting and often entertaining reading (the sometimes passionate comments attached to these posts are worth taking a look at, too):
Louise Harnby is a professional proofreader and copyeditor. She curates The Proofreader's Parlour and is the author of several books on business planning and marketing for editors and proofreaders. Visit her business website at Louise Harnby | Proofreader, say hello on Twitter at @LouiseHarnby, or connect via Facebook and LinkedIn.
Every writer, copy-editor and proofreader comes across words that are used correctly but spelled incorrectly (typos), but we also have to look out for words that are spelled correctly but used incorrectly – this is the world of confusables.
What are confusables?
Some confusables are not only spelled differently, they sound very different too, e.g. imply/infer; militate/mitigate; reactionary/reactive. In this case, the writer might have misunderstood the meaning. Some confusables are homophones – words that are spelled differently but sound the same, e.g. rein/reign; stationary/stationery; prophecy/prophesy; loath/loathe. In this case, the writer understands the different meanings, but is unsure of the appropriate spelling. Then there are errors that are simply a result of hands moving too fast over a keyboard – the meanings and correct spellings are known to the writer, but, in their haste, perhaps they’ve transposed a couple of letters or omitted a character. Or it may be that the automatic spellcheck has kicked into gear and the writer hasn’t noticed the problem because they’re concentrating on the bigger picture. Examples might include e.g. filed/field; adverse/averse; pubic/public. Blind spots Writers aren't the only ones with blind spots. Editorial pros do too. It’s our job to spot these problems and fix them. However, we’re only human and most of us have a few blind-spot words that our eyes are, on occasion, less likely to notice, even though we do know the differences in meaning and spelling. My own blind spots are gaffe/gaff, brake/break and peek/pique/peak. I don’t know why my eye doesn’t spot these pesky confusables as readily, especially when the likes of compliment/complement or stationary/stationery scream at me from the page! However, I accept that I do have blind spots and have taken steps to ameliorate the problem with a little mechanical help – the macro. How can macros help? Using macros enables us to identify possible problems before we get down to the business of actually reading, line by line, for sense. Every time we find an error, we have to think about it and decide whether to amend. By reducing the number of interruptions, we can focus our attention on the flow of the words in front of us and increase efficiency. For this reason, I, like many of my colleagues, run my macros at the beginning of a project (though I often repeat the process at the end stage too). What’s on offer in the world of confusables? There are several free macros available to the copy-editor or proofreader who wants to tackle confusables with efficiency. See, for example, the excellent “A Macro for Commonly Confused Words” published by C.K. MacLeod on Tech Tools for Writers (updated July 2015). Another option, and the one that I’m currently using, is the CompareWordList macro created by Allen Wyatt on WordTips. See “Highlight Words from a List” (updated July 2015). As some of you will already know, Wyatt has two WordTips sites; the one you use will be determined by which version of Word you’re running. The linked article above will take readers to the article written for MS Word 2007, 2010 and above. If you are working with an older version of Word, you’ll need to follow Wyatt’s links to the sister site. Why I’m using Wyatt’s CompareWordList CompareWordList is currently my preferred tool simply because of how easy it is to create and update my own list of words to be checked – words that can, on occasion, be blind spots for me. As I’ll show below, customizing the list of confusables doesn’t require me to amend the script of the macro once it’s installed. Instead, all I have to do is amend a basic list in a Word document – nice and simple! Using CompareWordList 1: Create your list of confusables The first thing to do is to create a list of the words you want the macro to find, and highlight, in a Word document.
Using CompareWordList 2: Get, and tweak, the code Visit “Highlight Words from a List” and copy the code. If you’re completely new to installing macros, just paste the script in a Word document for now so that you can tweak it easily. Below is a screenshot of Wyatt's code. The highlighted sections show where I’ve tweaked the code to suit my own needs. 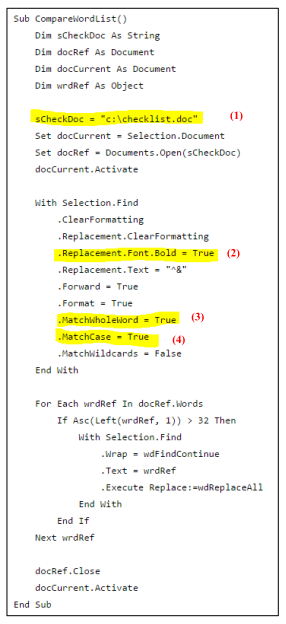
Screenshot of Allen Wyatt's CompareWordList macro code
Tweaks to consider
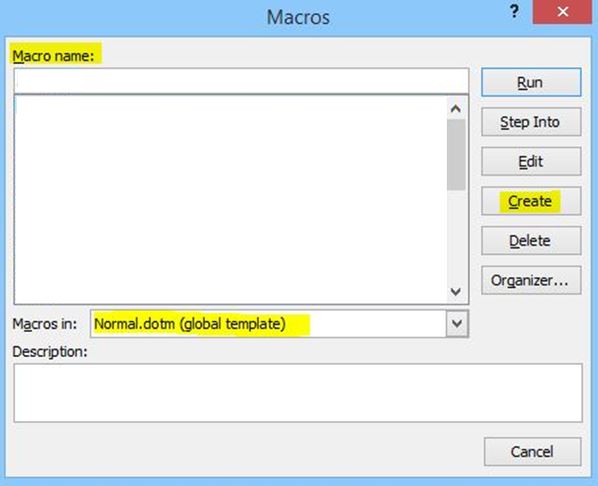
(1) I’ve changed Wyatt's code (as per his suggestion) so that it describes where my list of confusables is located: sCheckDoc = "c:\Users\Louise\Dropbox\Macros\confusables.docx". You’ll use the location you made a note of when you created your own list (see the section above – Using CompareWordList 1: Create your list of confusables). (2) Wyatt's code emboldens the words found by the macro; I wanted them highlighted so I replaced the highlighted text as follows: .Replacement.Highlight = True. (3) I changed the Match Whole Word instruction to False because I wanted the macro to find part words. This, of course, will pull up some false positives but it was the easiest solution I could find. (4) I also changed the Match Case instruction to False. Now that you’ve tweaked the code to suit your own needs, you’re ready to install it (the basic, step-by-step instructions below are provided for the benefit of those who are completely new to macro installation). Using CompareWordList 3: Install the code With Word open, open the “View” tab and click on the “Macros” icon on the ribbon. 
This will open up a new window.
If you don’t have any macros already loaded:

If you have macros loaded (your TEST macro or any other):

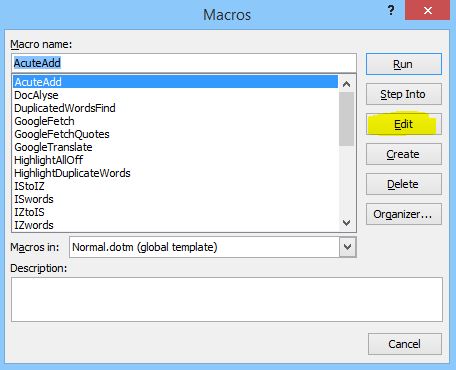
This will open up a further window:

Running CompareWordList
Removing highlights one by one Here’s a tiny macro that I recorded to remove a highlight as I move through a Word document. Installing this means I simply have to click on a highlighted word and run the macro. Assigning a shortcut button (see below) makes the job easy and efficient. I decided on Alt H because I don’t have that keyboard shortcut assigned to any function that I carry out regularly. Sub UndoHighlight() ' ' UndoHighlight Macro ' ' Options.DefaultHighlightColorIndex = wdNoHighlight Selection.Range.HighlightColorIndex = wdNoHighlight End Sub To install: Simply copy the red script above and install it in the same way that you installed the CompareWordList macro. To create a shortcut key: In Word, select File, Options, Customize Ribbon (1). Click on Customize (2). A new box will open up entitled “Customize keyboard”. In the Categories window (3), scroll down and select Macros. In the Macros window (4), select UndoHighlight. Finally, choose your preferred keyboard combination by typing it into the Press New Shortcut Key window (5). Select Assign and Close. 
To remove ALL highlighting in one go: For this job, Paul Beverley’s your man. A huge number of macros are available in his free book, Computer Tools for Editors (available on his website at Archive Publications).
Hope you find this useful!
Louise Harnby is a line editor, copyeditor and proofreader who specializes in working with crime, mystery, suspense and thriller writers.
She is an Advanced Professional Member of the Chartered Institute of Editing and Proofreading (CIEP), a member of ACES, a Partner Member of The Alliance of Independent Authors (ALLi), and co-hosts The Editing Podcast. Visit her business website at Louise Harnby | Fiction Editor & Proofreader, say hello on Twitter at @LouiseHarnby, connect via Facebook and LinkedIn, and check out her books and courses. "Not responding" ... do you sometimes see this message at the top of a Word window when it’s running a long macro? If so, you don’t need to panic. When a macro is running, if it’s taking rather a long time (according to Microsoft), Word displays a warning message in the title bar of the window – "Not responding" – and the screen display freezes. Actually, the macro hasn’t stopped working; it’s just that the macro is using up so much processing time that the computer’s operating system decides it hasn’t got time to update the screen display – well, not until the macro finishes. The user’s natural response at this point is to click on the screen – just to check if Word is still working. Definitely don’t do that! By clicking on the screen you’re trying to force Word to update the screen display, and that takes up even more processor time. This can then cause Word to crash altogether. [You did save that file before running the macro, didn’t you?!] So what should you do? Be patient. Make a cup of tea. Take the dog for a walk. Good news ... But there’s some good news, especially for users of my macros. I’ve discovered a new (to me) command (DoEvents) that I can put in my programs; it makes the macro stop for a fraction of a second and this allows the computer to update the screen. I won’t say that “Not responding" will be a thing of the past, but if you use the latest (8 November or later) versions of my macros you’ll still be able to see onscreen that something is still going on. More importantly, you will be able to see the prompts that the macro puts on the status bar down at the bottom of the window to show its progress. A final tip ... One final bit of advice still remains. For running macros that use lots of computer time, do try the macro out first with a more modest-sized document – a few thousand words – and not on your magnum opus 150,000-word book. Get the improved versions ... Improved versions of FRedit, HyphenAlyse, DocAlyse, ProperNounAlyse, SpellingToolkit, WordPairAlyse, etc. are available by downloading my free macro book here: Paul Beverley has over 25 years’ experience as a technical author, publisher, proofreader and editor, and has the highest available editing qualification: LCGI (editing skills). Paul is passionate about macros and has used his programming ability to complement his writing and editing skills. Through his series of Macro Chat posts, he aims to share his knowledge and open up a dialogue about the benefits of macros to anyone working with words. Comments and questions are always welcome so please do join the discussion. No question is too basic! Visit his business website at Archive Publications, and access his free book at Macros for Writers and Editors.
If you proofread or copyedit fiction or non-fiction, or you're self-editing your own books, here's a macro that will highlight potential inconsistencies in proper-noun usage.
I've been meaning to review some of my favourite proofreading macros for a while now and ProperNounAlyse deserves its first place in the queue (only because it performed so brilliantly on a recent proofreading project!).
ProperNounAlyse is just one tool among many, of course. Those of us who use macros on a regular basis have a whole suite of them that we run during the process of a proofread or a copy-edit. ProperNounAlyse was created by my colleague Paul Beverley, and it’s just one of a huge number of macros available in his free book, Computer Tools for Editors (available on his website at Archive Publications). I've written this post for the person who doesn't use macros and is nervous about trying. I think it’s such a shame when a fear of tech leads to lost opportunities for those who want to increase productivity (which is great for the editorial pro) and improve quality (which is great for the client). Why bother? Three reasons
Go to Paul’s website and download Computer Tools for Editors. Save the zipped folder to your computer and extract three files: One is an overview of the macros – what they are, what they do, how to store them and so on – plus all the programs themselves; another contains just the actual macro programs; and the final file is a style sheet. The file you need to open in Word is “The Macros”. Use Word’s navigation menu (or Ctrl F on a PC) to open the Find function. Type “Sub ProperNounAlyse” into the search field and hit Return. That will take you to the start of the relevant script. Select and copy the script from “Sub ProperNounAlyse()” down to “End Sub”. Paul’s helped us out by highlighting the name of each new macro. Still with Word open, open the “View” tab and click on the “Macros” icon on the ribbon. 
This will open up a new window.
If you don’t have any macros already loaded:
If you have macros loaded (your TEST macro or any other):
This will open up another window:
Running ProperNounAlyse

A fictive sample
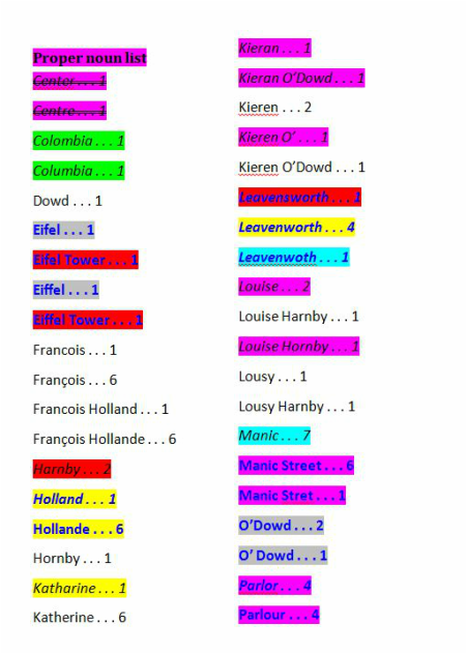
Below is a simple word list of proper nouns with lots of inconsistencies – differences in accent use, apostrophe use and spelling. 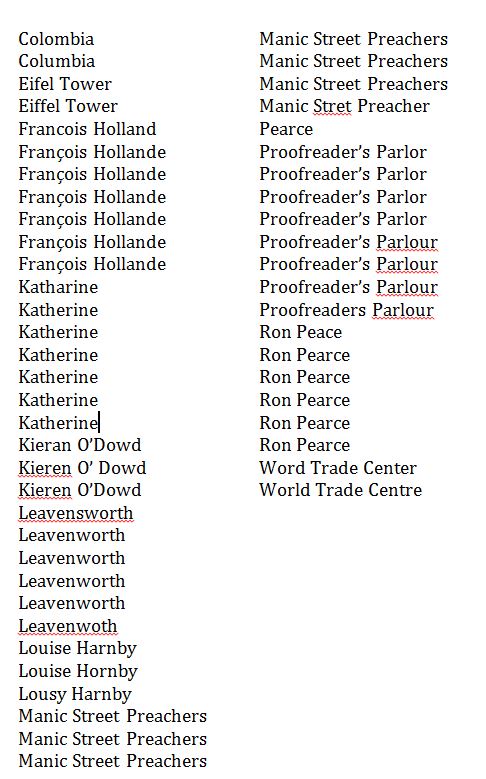
I run ProperNounAlyse on the document. It analyses the text and then creates a new Word file with the following results:
I’m provided with an at-a-glance summary of potential problems that I need to check. It may be that the differences identified are not mistakes, but I know what to look for.
“I don’t need to use techie tools … my eyes are good enough” Macros don’t get tired. Macros don’t get distracted. I don’t believe any proofreader who claims they can do as good a job with their eyes alone as they can do with their eyes and some electronic assistance. It’s a case of using these kinds of tools as well as, not instead of, the eyes and brain. I could have relied on my eyes to find all of the above problems, and in a small file I would hope to have hit the mark 100%. But if I’d been working on 100,000 words of text, and there were twenty key characters, a plethora of grammatical glitches, two major plot holes, numerous layout problems, and a mixture of hundreds of other inconsistencies regarding hyphenation, capitalization, punctuation and regional spelling variation, there would have been a lot of problems to solve; I want to utilize every tool available to help me do that. Yes, my eyes and brain are two of those tools. But using macros like ProperNounAlyse and others (PerfectIt, for example, just because it’s another favourite!) speeds me up, pure and simple, and massively reduces the chance of a miss. I ran ProperNounAlyse on a recent fiction proofread for an independent author who is a phenomenally good writer – great plot, excellent pacing, engaging characters. But he was so busy crafting the 95,000 words it took to build a fantastic story that he’d introduced a lot of proper-noun inconsistencies. That’s fine – it’s not his job to deal with these; it’s mine. It took me minutes, rather than hours, to locate them and deal with them. And I know I found them – every one of them. What will the client remember? If you’re still reluctant to try out ProperNounAlyse (or any other editorial tool for that matter), consider this: What will the client remember? The three hundred mistakes that you spotted or the three howlers you missed? When it comes to proper nouns, especially in large volumes of character-based editorial work, it’s too easy to miss a discrepancy. And character names stand out to readers. Taking just a few minutes to run a simple-to-use macro might determine whether your client thinks your work was pretty good or outstanding. Which of those is likely to gain you a repeat booking or a referral to another potential client?
Louise Harnby is a line editor, copyeditor and proofreader who specializes in working with crime, mystery, suspense and thriller writers.
She is an Advanced Professional Member of the Chartered Institute of Editing and Proofreading (CIEP), a member of ACES, a Partner Member of The Alliance of Independent Authors (ALLi), and co-hosts The Editing Podcast. Visit her business website at Louise Harnby | Fiction Editor & Proofreader, say hello on Twitter at @LouiseHarnby, connect via Facebook and LinkedIn, and check out her books and courses.
In this post I show you how to reorganize the display of your digital proofreading stamps in PDF-XChange so you can improve the efficiency with which you work.

The free digital stamps files I’ve provided here on The Editing Blog contain over 70 individual images, all based on the British Standards Institution’s “Marks for copy preparation and proof correction” (BS 5261C:2005).
The issue for many newbies is that the palette can appear cumbersome – we all work in different ways, and the symbols that we most often use may not be positioned in the most convenient place for our particular needs. Having the full palette open on the screen takes up a lot of space, even if, like me, you use multiple screens. I prefer to have my palette near the text because it’s quicker to access, thus increasing my efficiency: 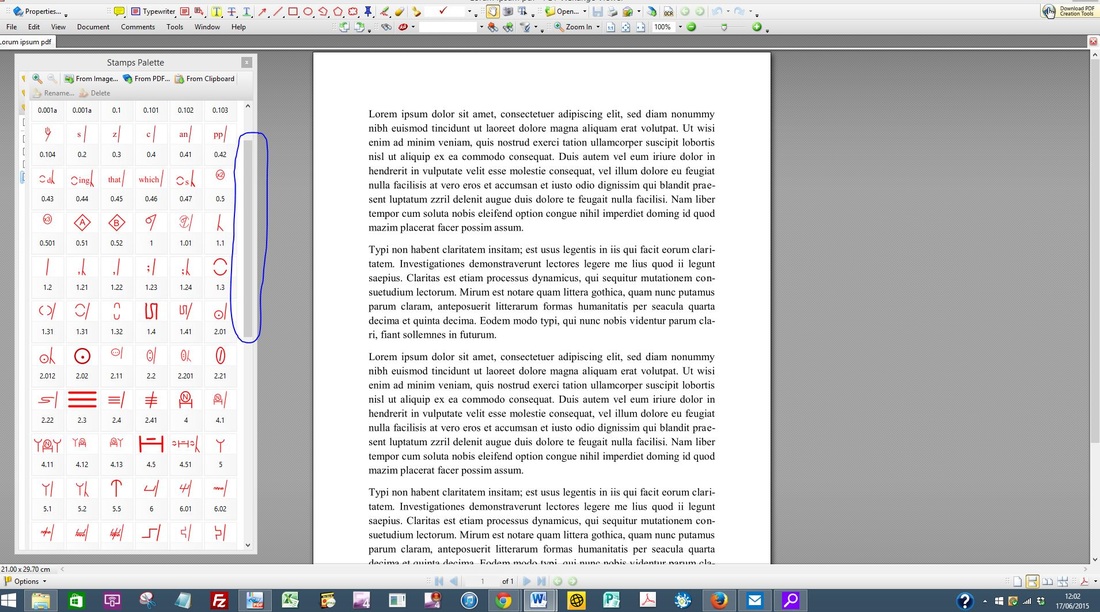
Decreasing the size of the palette is one option, and allows placement on the screen that won’t interfere with the text. However, this requires using the scroll bar on the palette in order to access the stamps located further down the palette, reducing efficiency further because not all the stamps are on display.
Reorganizing the stamps for your own needs
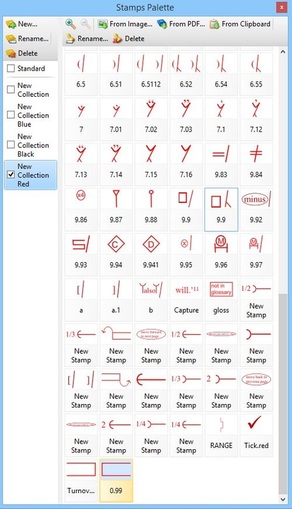
When I created the original stamps files, I ordered them according to what my specific needs were at that time. But my preferences have changed since 2012, and it’s not unusual for my current preferences to change on a job-by-job or client-by-client basis. For example, one particular client for whom I work provides me with PDFs that frequently require the use of the Turn over character(s)/word(s)/line(s) symbol. This symbol is located near the end of the downloadable stamps files. This meant that when I first opened up the palette in XChange it appeared as follows (see highlighted area at the bottom of the image below): 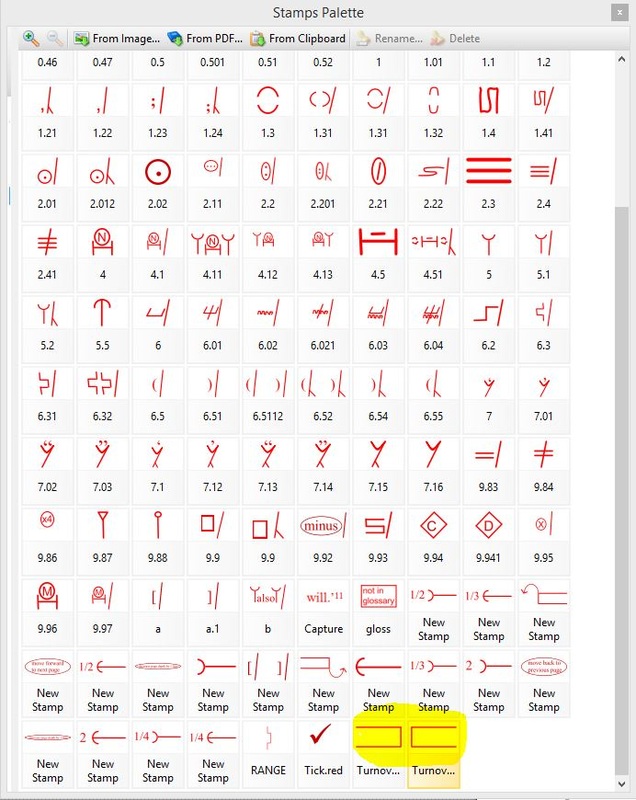
The solution is to move the frequently used symbol to the top of the palette for this particular client work. This is most simply done by renaming the stamp in a way that forces it into the required position. My preference is to name most of my stamps with numbers rather than descriptive names (see image above and compare the often-used Delete symbol (named 1) with the rarely used Change to small caps mark (named 9.83).
The beauty of renaming with numbers is that you have the freedom to move any stamp anywhere at any time. You can change the positions as and when you wish. For demonstration purposes, I’ve chosen to move the right-hand margin Turn over symbol to the top of the palette and place it next to the Delete symbol. The process is quick and simple: 1) Left-click on the symbol you want to move. The area below the mark, where the symbol's name is located, will appear with an orange tint. 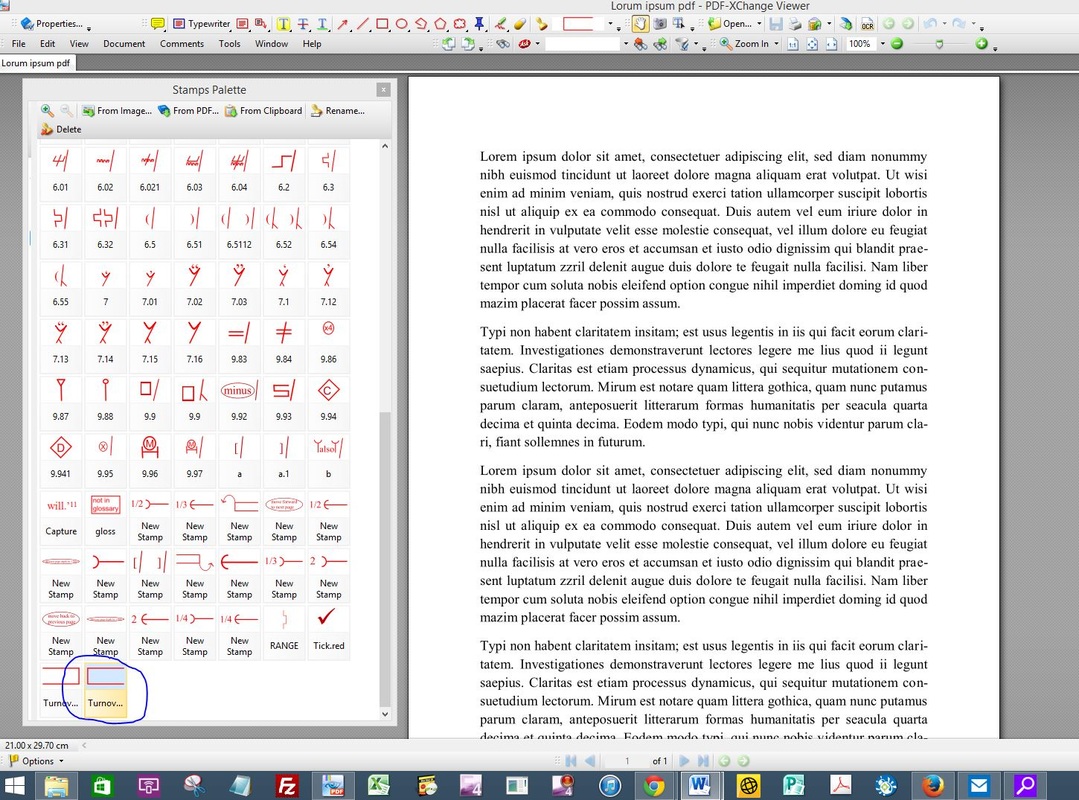
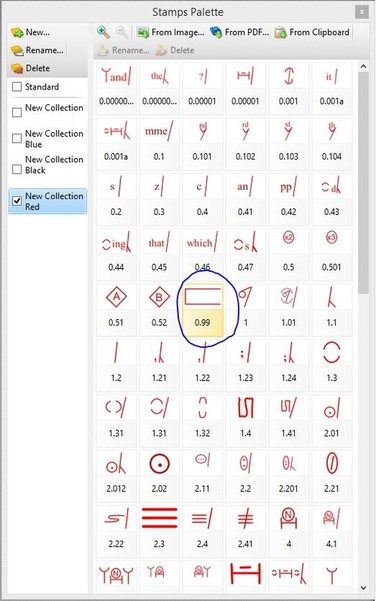
2) Move your mouse to the top of the palette and left-click on the “Rename” tab. A window will appear, housing the stamp’s current name.
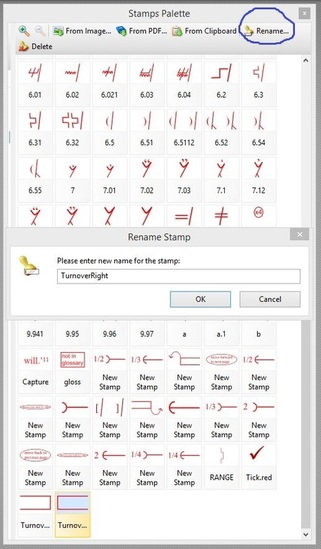
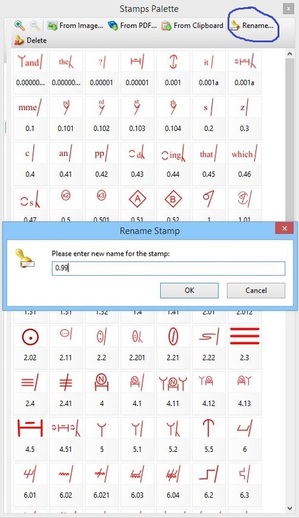
3) Type in a new numbered name that will force the stamp into the numerically ordered position you desire. In this case, I want the Turn over symbol to appear next to the Delete symbol. Delete is named “1”; the stamp to the left is named “0.52”. Choosing any number between 0.52 and 1 for Turn over will therefore ensure preferred placement. I decide to rename Turn over as “0.99”. I type in the number and select “OK”.
4) Note that the stamp has been renamed but it still hasn’t moved into its new position.
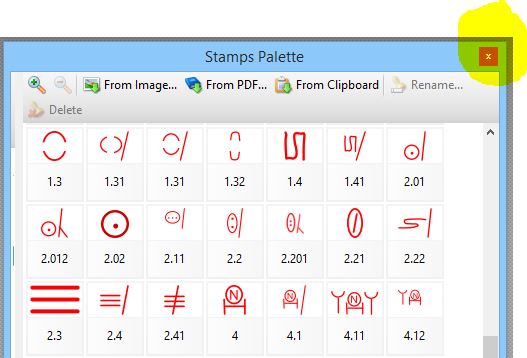
In order to force the repositioning, I need to move out of the currently displayed palette and then reopen it. This can be done in two ways. Either close the palette completely by clicking on the X in the top-right-hand corner of the window (then reopen via the menu: Tools>Comment And Markup Tools>Show Stamps Palette) …
… or switch to a different Collection and then move back into the original Collection in which you renamed your stamp. The Collections can be found on the left-hand sidebar of the XChange palette, and you can move this sidebar in and out of view by clicking on and dragging the thick grey line, as highlighted below.
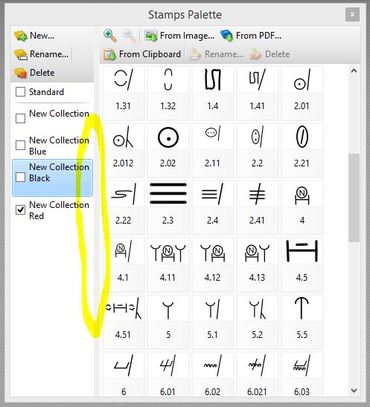
5) When you reopen the palette and click on the appropriate Collection, you’ll see your renamed stamp positioned exactly where you want it. To move the Collections sidebar out of view, simply click and drag on the grey line. This will provide more space in which to display all your proofreading symbols.
Marginal gains for increased efficiency
If renaming stamps seems like a lot of effort for little reward, remember that marginal gains count for a lot with editorial work. This is why tools such as macros, shortcuts and find/replace are useful. The same applies to creating an efficient stamps palette. Every second you spend scrolling to find the stamp you want adds up. Seconds become minutes, and minutes become hours. If you’re being paid per hour, and your client doesn’t have a top-line budget, it may not matter how long it takes you to do a job, nor that you’re working inefficiently. However, many clients do have a top line, and many editorial professionals are working for fixed fees. Efficiency matters. Furthermore, some of us need to attend to the way in which we use our hands, wrists and arms repetitively when working onscreen. Organizing a stamps palette in a way that is memorable to you, and enables the fastest possible access, speeds up the onscreen markup process and reduces physical strain. If you haven’t got round to renaming your stamps numerically, try it and see whether it makes a difference.
Louise Harnby is a line editor, copyeditor and proofreader who specializes in working with crime, mystery, suspense and thriller writers.
She is an Advanced Professional Member of the Chartered Institute of Editing and Proofreading (CIEP), a member of ACES, a Partner Member of The Alliance of Independent Authors (ALLi), and co-hosts The Editing Podcast. Visit her business website at Louise Harnby | Fiction Editor & Proofreader, say hello on Twitter at @LouiseHarnby, connect via Facebook and LinkedIn, and check out her books and courses.
Like so many of my proofreading and editing colleagues, I never rely on my eye alone. I’m human, and my eye sometimes sees what it wants to see rather than what’s there, even when I’m working with clients rather than reading for pleasure.
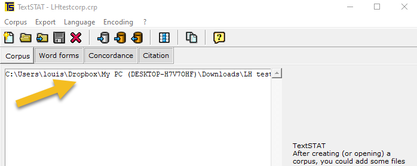
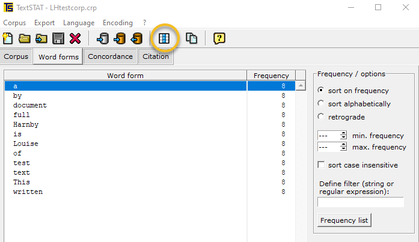
TextSTAT: Creating a frequency list
One of my favourite tools is TextSTAT. Actually, it wasn’t created with the proofreader or editor in mind. Rather, the program was designed to enable users to analyse texts for word frequency and concordance. However, I use it to generate, very quickly, simple alphabetized word lists.
Time and again, those word lists have flagged up potential problems that I need to check in a proofreading or copyediting project. If I'm proofreading a PDF, I strip the text from the PDF proof and dump it into a Word file. I remove word breaks from that Word file (using "-^p") so that TextSTAT generates a list of whole words that I can compare, rather than thousands of useless broken words). If I'm editing in Word, I can obviously bypass the above steps. Identifying potential problems in text
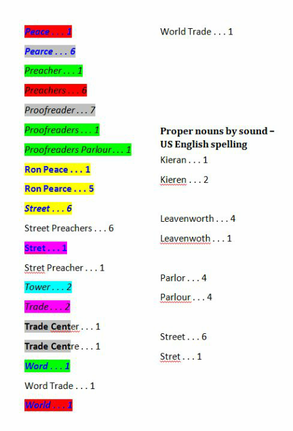
Here’s a small sample from a word list I generated in TextSTAT. As you can see, there are several possible problems:
(The colour coding is mine; I've provided it for clarity only. TextSTAT's word lists are in plain text.)
Upon checking the actual proofs, some of these issues turned out to be fine. For example:
Some issues had to be queried. For example:
Some issues needed further checking and amending. For example:
When proofreading hard-copy or PDF proofs, would I have spotted these problems with my eye alone? I'm not confident I'd have got everything, particularly the issues with the names of the less well-known cited authors. And if "beginings" had been in point-9 italic text, my eye might have passed over the missing letter. Where’s the context?
There is no context – that’s the point. When using TextSTAT as a word-list generation tool, we’re just looking at one word and how it compares with words above and below it in our list.
We’re not reading phrases; we’re not paying attention to grammar and syntax. It’s just a long list of words in alphabetical order. Later, we can focus on the words in context – TextSTAT’s word lists are just a tiny part of a process that help the proofreader or editor to provide his or her client with a polished piece of work. Fast, free and offline
TextSTAT isn’t the only word-list generation tool available for free. However, I love it because it can handle huge chunks of text without glitching – it will quickly generate word lists for books with hundreds of thousands of words (the sample I gave above was taken from a project of over 150,000 words, but I’ve used the program for larger projects). It’s never crashed on me.
You can download the software to your own computer, so there’s no issue regarding confidentiality. My clients don’t want me to upload their content to third-party browsers without their permission, so when I use a particular proofreading tool to augment my eye, that tool needs to be able to sit offline on my PC. Furthermore, it costs nothing. Say the creators: “TextSTAT is free software. It may be used free of charge and it may be freely distributed provided the copyright and the contents of all files, including TextSTAT.zip itself, are unmodified. Commercial distribution of the programme is only allowed with permission of the author. Use TextSTAT at your own risk; the author accepts no responsibility whatsoever. The sourcecode version comes with its own license." Is it worth the effort?
Some might think that an hour or so trawling through a simple word list, and cross-checking any potential problems against hard copy or PDF, is a lot of extra time to build into a proofreading project. I think that time improves the quality of my work and increases my productivity.
When I come to the actual reading-in-context stage, I'm confident that some really serious snags have already been attended to. That gives me peace of mind and enables me later to focus on other important issues like the page layout, the sense of the text, and more. I've found that using this method for dense academic projects has been particularly worthwhile. However, I'll not forget a recent fiction project (a "big name"-authored book that's in its nth edition and was first published over two decades ago) where the main protagonist's name was spelled incorrectly in two places: an easy thing to miss again and again over many years and many proofreads. I caught it – not because my eyes are better than those who came before me, or because I'm a better proofreader than those who came before me, but because I used a simple tool that allowed me to concentrate on just the words. Want to try TextSTAT?
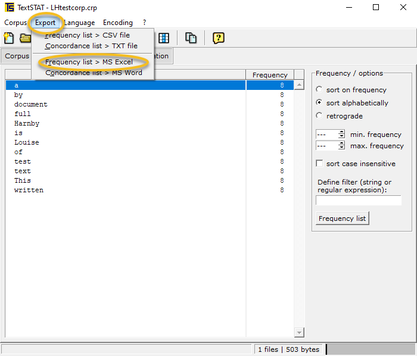
If you want to give it a spin, it’s available from NEON - NEDERLANDS ONLINE.
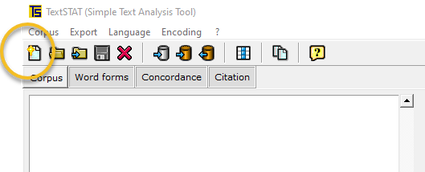
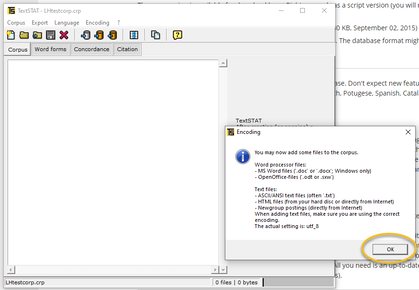
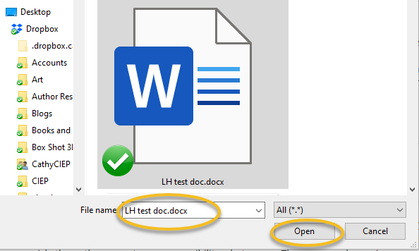
The usual caveat applies: generating word lists as part of the proofreading and editing process isn't the one and only true way. TextSTAT is an example of one tool that I and some of my colleagues utilize to improve the quality of our work. You might utilize different tools and different methods to achieve the same ends. All of which is great! How to use TextStAT
These instructions are correct as of 24 June 2021.


Louise Harnby is a line editor, copyeditor and proofreader who specializes in working with crime, mystery, suspense and thriller writers.
She is an Advanced Professional Member of the Chartered Institute of Editing and Proofreading (CIEP), a member of ACES, a Partner Member of The Alliance of Independent Authors (ALLi), and co-hosts The Editing Podcast.
If your client wants sensitive end-of-line word-breaks in their text, and they will if they're asking you to proofread for print, this online tool will help you decide where to break the word and insert the hyphen.

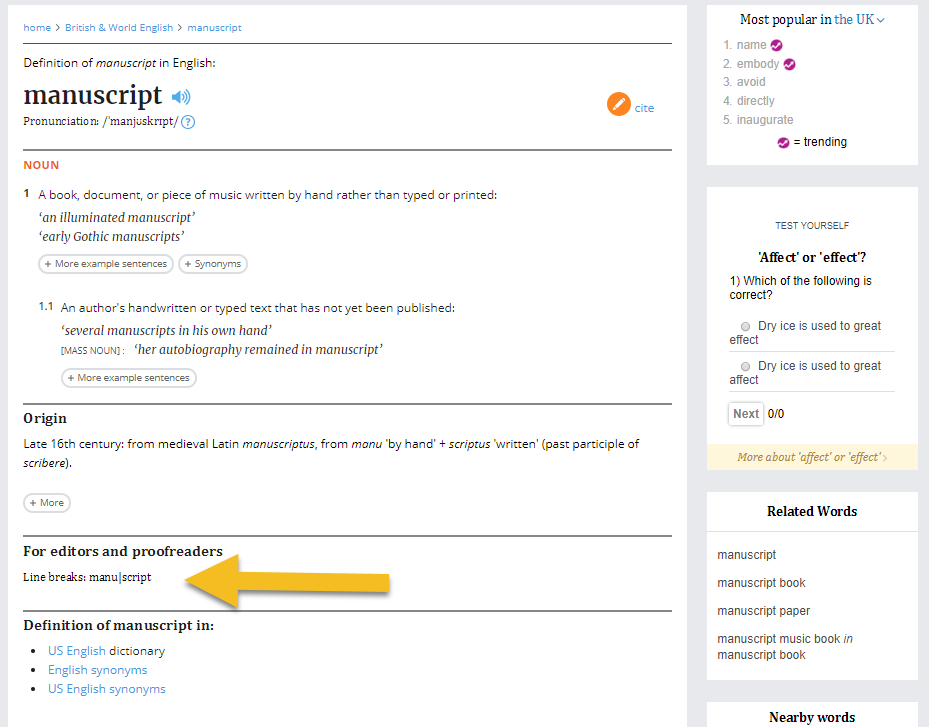
For example, Oxford Dictionaries recommends the following:
There's always the trusty New Oxford Spelling Dictionary, an authority on spelling and word division. However, if you have clients that want every end-of-line hyphen checked, you'll need something more efficient than a book.
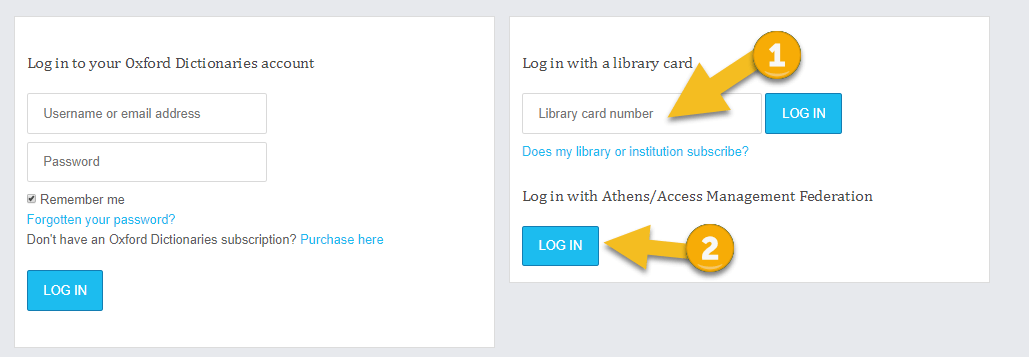
Perhaps you work on magazine articles, three columns to a page. Word breaks abound. And since the client pays on a flat-fee basis for each job, looking up these darn things impacts on your hourly rate in no small way. Oxford Dictionaries includes online access to its dictionaries and thesauri, New Hart's Rules and Pocket Fowler's Modern English Usage. It also includes a function for checking word-breaks. I'm not chucking away my print book quite yet. There are limitations to the online version. For example, 'wingless' doesn't have its own entry, but is part of the definition of 'wing', so the preferred break (wing | less) isn't offered. Still, productivity increases are only a click away if you have to check end-of-line word-breaks frequently. To access, go to Oxford Dictionaries. 
You might have to pay for an account. However, if you're a member of a UK library, access is free. Pop in your library card number (1) and click on the LOGIN button (2).
Now select the language.
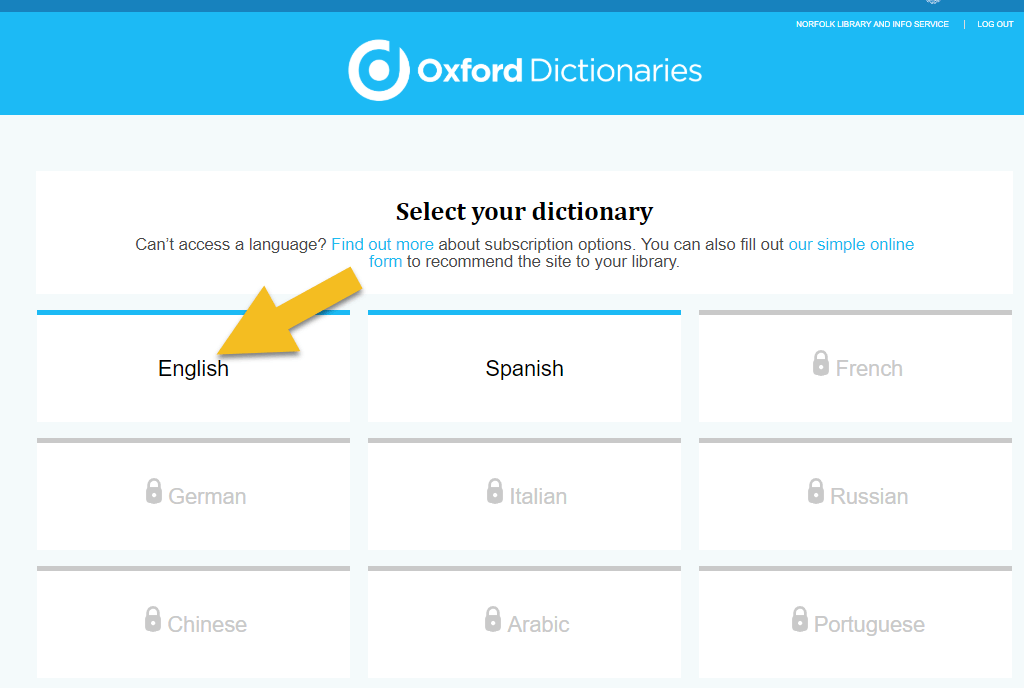
Type in your word, then scroll down to FOR EDITORS AND PROOFREADERS. There you'll find the recommended break where the word should be broken and the hyphen inserted.
Louise Harnby is a line editor, copyeditor and proofreader who specializes in working with crime, mystery, suspense and thriller writers.
She is an Advanced Professional Member of the Chartered Institute of Editing and Proofreading (CIEP), a member of ACES, a Partner Member of The Alliance of Independent Authors (ALLi), and co-hosts The Editing Podcast. Visit her business website at Louise Harnby | Fiction Editor & Proofreader, say hello on Twitter at @LouiseHarnby, connect via Facebook and LinkedIn, and check out her books and courses.
Considering setting up a proofreading business? Or perhaps you're already on the journey. Here are 10 things you need to know and 10 more you need to do.
10 things you need to know ...
10 things you need to do ...
If you'd like more comprehensive guidance about starting a proofreading business, my books might be just the ticket. Written for those with no prior publishing or editorial experience, these practical guides take the new starter, step by step, through the basics of planning an editorial career and marketing their services.
Louise Harnby is a line editor, copyeditor and proofreader who specializes in working with independent authors of commercial fiction, particularly crime, thriller and mystery writers.
She is an Advanced Professional Member of the Society for Editors and Proofreaders (SfEP), a member of ACES, a Partner Member of The Alliance of Independent Authors (ALLi), and co-hosts The Editing Podcast. Visit her business website at Louise Harnby | Fiction Editor & Proofreader, say hello on Twitter at @LouiseHarnby, connect via Facebook and LinkedIn, and check out her books and courses.
If you're looking for an easy and free way to schedule your editing and proofreading projects – clients, income, payment-due dates – this free Excel template is for you.
Keeping track of editing and proofreading projects is essential for every professional editor.
Download this free Excel template to get you started. The figures are completely made up but show the basic structure. If you're a newbie, you can use this as an interim way of managing your accounts and your schedule; one less thing to worry about for now! This template includes a number of columns with formulae that I find useful.
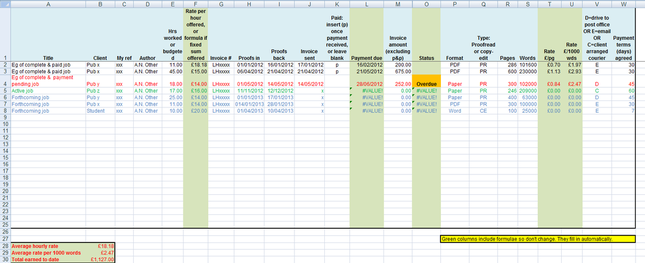
I like to differentiate between different stages of the process:
It helps me to see, at a glance, what's going on in my schedule, especially when a client asks about availability. I also track how the job will be returned to a client: via email, the post office or courier (at the client's expense). The UK's HMRC allows the freelancer to offset a percentage of mileage costs against their tax liabilities. There's a summary box at the bottom of the spreadsheet. This shows me my average earnings, my average hourly rate and my average rate per 1,000 words. These figures are really only for curiosity, since each job varies quite considerably in size, type, budget, difficulty and speed. If I was doing any serious analysis I'd look more deeply into the data to assess whether there are patterns in terms of, say, client type, service offered and subject matter. Still, it's useful for grabbing quick-and-dirty data for annual comparisons. Feel free to copy, amend or ignore as you see fit. You can add your own formulae to particular columns if the way in which you charge for your work differs. 
Louise Harnby is a line editor, copyeditor and proofreader who specializes in working with crime, mystery, suspense and thriller writers.
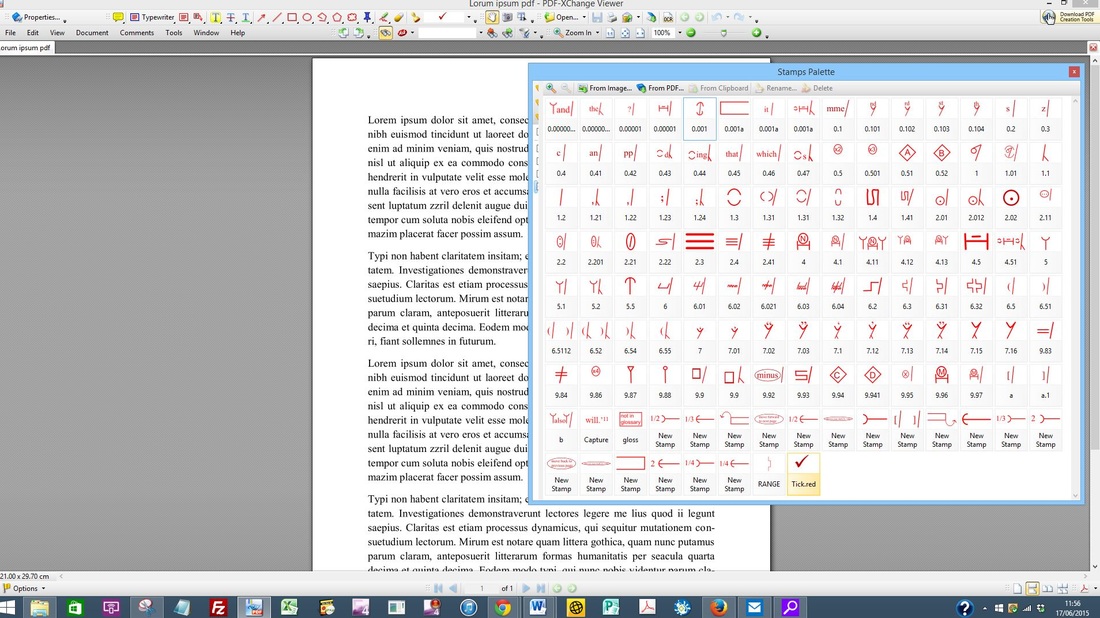
She is an Advanced Professional Member of the Chartered Institute of Editing and Proofreading (CIEP), a member of ACES, a Partner Member of The Alliance of Independent Authors (ALLi), and co-hosts The Editing Podcast. Visit her business website at Louise Harnby | Fiction Editor & Proofreader, say hello on Twitter at @LouiseHarnby, connect via Facebook and LinkedIn, and check out her books and courses. If you don't have the full paid-for versions of, say, Adobe Acrobat or PDF-XChange, you can still use my proofreading stamps. At a recent local SfEP chapter workshop, my colleague Sara Peacock demonstrated the stamps. She says: "The stamps work with [the free] Adobe Reader, but the proofreader will need to ensure that whoever creates the PDF 'enables comments' before sending it, otherwise the comment tools that are needed (as well as the stamps, the pencil tool, the strikeout tool, and so on) won't be accessible. "However, all of these tools (or their equivalents) are available in the free PDF-XChange viewer, in which the stamps can also be used. (Personally, I find it a more stable piece of software than the Adobe version so I use it all the time anyway. It's a bonus that I don't need to insist on enabled PDFs.)" I normally work in the full version of Acrobat Standard, but following Sara's comments I decided to give XChange Viewer a try. I must say, it was a doddle and the functionality is exceptional given that this won't cost you anything. The stamps palette is much clearer, for one thing, and uploading the stamps is quicker, too. I'd recommend giving Viewer a try, even if you're a die-hard Acrobat user! Even better, XChange Viewer allows you to upload them all in one go! To access the stamps files, see the article Free Downloadable Proofreading Stamps. For a more detailed look at using stamps for onscreen work, go to PDF Editing: Making the Most of the Stamps Tool. For installation instructions, click here.  A sample of just a few of my proofreading stamps. Tips
 PDF-XChange Viewer: screenshot of stamps palette and minimizing tool. Louise Harnby is a line editor, copyeditor and proofreader who specializes in working with crime, mystery, suspense and thriller writers. She is an Advanced Professional Member of the Chartered Institute of Editing and Proofreading (CIEP), a member of ACES, a Partner Member of The Alliance of Independent Authors (ALLi), and co-hosts The Editing Podcast. Visit her business website at Louise Harnby | Fiction Editor & Proofreader, say hello on Twitter at @LouiseHarnby, connect via Facebook and LinkedIn, and check out her books and courses.
Want to annotate a PDF with digital proofreading marks? Below are my free proofreading stamps files in red, blue and black. They conform to British Standard BS 5261-2 (2005).
You will not have to resize these stamps – I've designed them to work with the font size that most book files use. Simply upload them into your PDF editor and you’re ready to go!
|
PDF MARKUP
AUTHOR RESOURCES
EDITOR RESOURCES
TESTIMONIALSDare Rogers'Louise uses her expertise to hone a story until it's razor sharp, while still allowing the author’s voice to remain dominant.'Jeff Carson'I wholeheartedly recommend her services ... Just don’t hire her when I need her.'J B Turner'Sincere thanks for a beautiful and elegant piece of work. First class.'Ayshe Gemedzhy'What makes her stand out and shine is her ability to immerse herself in your story.'Salt Publishing'A million thanks – your mark-up is perfect, as always.'CATEGORIES
All
ARCHIVES
April 2024
|
||||||||||||||||


 RSS Feed
|
|
|
|

|

|
|
|
|

© 2011–2024 Louise Harnby